


Your Ultimate Family Guide to Making a Sukkah
Building a sukkah is one of those projects that truly fills my heart. It's so much more than just a construction project; it’s a beautiful mix of tradition, creativity, and some serious family fun. You basically break it down into a few key parts: figuring out the basic rules, getting your materials ready (whether you buy a kit or go full DIY), putting up the structure, and then the best part—decorating it with all your personal touches.
Honestly, think of it as creating a special outdoor clubhouse for one of the most joyful weeks of the entire year!
Your Joyful Journey to Making a Sukkah Begins Here
Welcome to one of my favorite projects of the whole season! Making a sukkah is so much more than a building task—it’s about creating a magical, temporary home where you’ll share meals, laughter, and celebrations with family and friends. I want this guide to be your enthusiastic companion, designed specifically for families who are ready to jump into this beautiful mitzvah with confidence and pure joy.
A Blueprint for Family Memories
I'm going to walk you through every single step, from understanding the core traditions in simple terms to gathering your materials and raising those walls. Think of this as your blueprint for building incredible memories and connecting your kids to their heritage in a hands-on, unforgettable way.
This project is about so much more than just wood and nails; it's a way to tangibly live out our traditions. It’s a chance to connect, where every hammered nail and every hung decoration becomes a part of your family’s unique story. The real goal is to make the experience of building it just as meaningful as the finished sukkah itself.
What You Will Discover
This guide is packed with everything you need to feel totally prepared, whether you're a seasoned DIY pro or this is your very first time. We’ll cover all the essentials to get you going:
- The Essential Rules (Made Easy): We'll break down the halacha (Jewish law) without any confusing jargon, so you can build with total confidence.
- Practical Building Tips: From picking out the right materials to putting the frame together, you’ll get clear, actionable advice that actually works.
- Fun Family Ideas: Discover creative ways to get everyone involved—even the little ones!—turning construction day into a full-blown celebration.
The sukkah was never built to keep the wind out. It was built to teach us how to live in the wind—to stay human, faithful, and kind even when the world is unsteady.
By the time you're done, you won't just have a sukkah; you'll have a heartwarming story to tell and a beautiful space filled with love. This hands-on project is one of the most powerful character-building activities for kids you can do together, teaching persistence, creativity, and the pure joy of a shared accomplishment. It's a structure built not just from materials, but from teamwork and laughter.
Getting to the Heart of Your Sukkah
Before we even think about grabbing a hammer or opening a sukkah-in-a-box, let's talk about the why. This is so much more than just a backyard building project; it's a beautiful act, brimming with thousands of years of meaning. The rules for building a sukkah, called halacha, aren't just technical specs. They're ancient guidelines that transform a simple structure into a sacred space, connecting us directly to our ancestors.
Think of these rules as the soul of your sukkah. They ensure that every temporary dwelling, whether it's a sleek kit on a city balcony or a rustic frame in a suburban yard, shares the same spiritual DNA.
It all boils down to three key parts: the walls, the roof covering (known as s'chach), and where you put it.
The Walls That Welcome
The walls are what create that cozy, intimate feeling inside your sukkah. And the good news? The rules are surprisingly flexible, so you can make it work in almost any space.
Jewish law says a kosher sukkah needs at least two full walls and a small piece of a third wall. That "small piece" only needs to be 3.2 inches wide—that's it!
As for height, the walls need to be at least 32 inches tall, and the whole sukkah can't be taller than 30 feet. These dimensions keep it feeling like a temporary shelter, not a permanent building. So, if you're setting up in a corner against two fences, you're already most of the way there! You just need to add that small third wall, and you're golden.
The S'chach That Connects
Okay, let's talk about the roof, or s'chach. This is, without a doubt, the most spiritually important part of the whole structure. It’s what makes a sukkah a sukkah! The s'chach must be made from something that grew from the ground but is now detached from it.
- What works? Palm fronds, bamboo poles, evergreen branches, or even those cool roll-up bamboo mats made just for this purpose.
- What doesn't? Things like metal sheets, plastic tarps, or solid wood planks won't work here.
The real magic is in the balance. You need to lay the s'chach loosely enough to glimpse the stars at night, yet densely enough to provide more shade than sun during the day. It’s a beautiful physical reminder of our connection to nature and our trust in divine protection.
The Location With a View
Where you build your sukkah is just as critical as how you build it. The number one, non-negotiable rule is that your sukkah must be built directly under the open sky.
A sukkah was never built to keep the wind out. It was built to teach us how to live in the wind—to stay human, faithful, and kind even when the world is unsteady.
That means no building under a permanent roof, a pergola, a big leafy tree branch, or the balcony of the apartment above you. The s'chach needs a clear, straight shot to the heavens. This setup symbolizes our direct connection to the divine, with no earthly barriers getting in the way.
To make this all crystal clear, here’s a quick-glance blueprint of the essentials.
Sukkah Building Blueprint At a Glance
| Component | Key Requirement | Quick Tip |
|---|---|---|
| Walls | At least 2.5 walls (2 full, 1 partial of 3.2 inches). Height: 32 inches min, 30 feet max. | Use existing fences or walls of your house as one or two of your sukkah walls to save time and materials! |
| S'chach | Made of natural, detached plant material (e.g., branches, bamboo). | Lay the s'chach perpendicular to the support beams to prevent it from falling through. |
| Location | Directly under the open sky—no overhangs! | Do a "sky check" before you start building. Stand where you plan to build and look straight up. |
Getting a feel for these foundational principles turns the whole process from a chore into a meaningful ritual. Every measurement and piece of material becomes part of a tradition that celebrates faith, family, and the simple beauty of our world. Understanding the spirit behind the rules is a great way to explore more about Jewish holidays and their meanings.
Now that we have the "why" down, we're ready for the "how"
Gathering Your Supplies: From Framework to Finishes
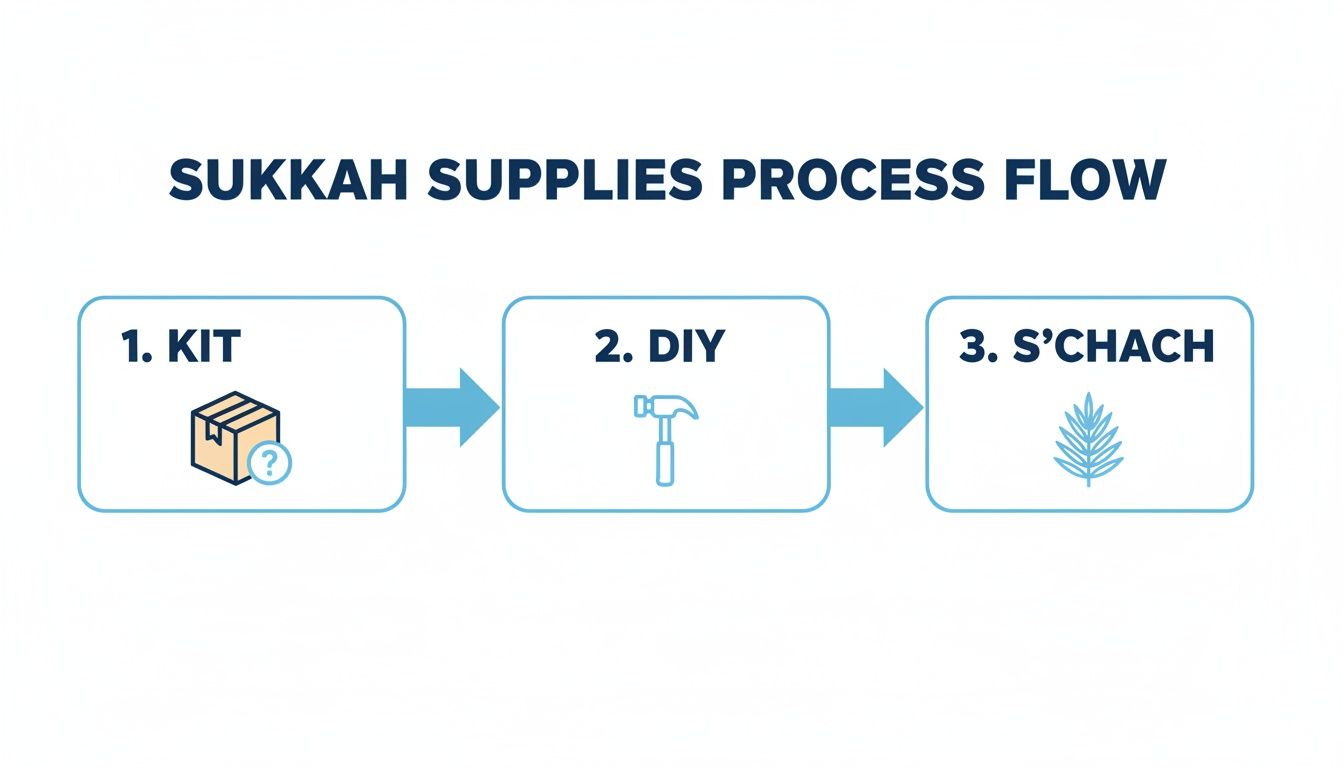
Alright, this is where the sukkah starts to feel real—it's time for the ultimate supply run! Think of yourself as an adventurer on a quest. Your mission is to gather everything you need to create your family's festive headquarters. There are two main paths you can take on this journey, and neither one is better than the other; it’s all about what works for your family's time, budget, and DIY spirit.
The first path? The sukkah kit. This is the express lane to sukkah building! Kits are brilliant because they come with pre-measured poles, connectors, and wall fabrics, taking all the guesswork out of the equation. They are a fantastic choice for first-timers or anyone who’s just plain short on time.
The second path is the DIY sukkah. This is for the family that loves a good project and isn't afraid of a little sawdust! Building from scratch gives you complete creative freedom over the size, shape, and materials. It's a deeply rewarding experience, turning raw materials into a sacred space with your own hands.
The Kit Route: A Simple Checklist
Choosing a kit is all about convenience and speed. Seriously, most can be assembled in just a couple of hours. When your box arrives, I always recommend doing a quick inventory to make sure everything is there before you start building.
Here’s what you should find inside:
- Metal or PVC Poles: These will form the skeleton of your sukkah.
- Connectors and Fittings: Think of these as the joints that hold the whole frame together.
- Fabric or Tarp Walls: These are usually made of durable, weather-resistant material.
- Zip Ties or Bungee Cords: Absolutely essential for securely attaching the walls to the frame.
- S'chach Mat (often sold separately): A pre-made, kosher roll of bamboo or palm fronds.
Even with a kit, you'll likely need a couple of basic tools. A small rubber mallet can be a lifesaver for tapping poles into connectors without damaging them, and a step stool is non-negotiable for reaching the top of the frame safely.
The DIY Adventure: A Materials Deep Dive
Going the DIY route opens up a world of possibilities. You get to be the architect and the builder, which is an amazing feeling. The first big decision you'll need to make is what to use for your frame.
| Frame Material | Pros | Cons | Best For |
|---|---|---|---|
| Wood Planks (2x4s) | Very sturdy, traditional look, highly customizable. | Heavy, requires cutting and screwing, needs more skill. | Families wanting a robust, long-lasting sukkah. |
| PVC Pipes | Lightweight, affordable, easy to cut and assemble. | Less sturdy in high winds, can bend over large spans. | Budget-conscious builders or smaller sukkahs. |
| Metal Conduit | Stronger than PVC, relatively lightweight, professional look. | Requires specific connectors, can be harder to cut. | A durable but manageable DIY project. |
Once you've chosen your frame material, you'll need a basic toolkit. Think of this as your builder's treasure chest. Essentials include a power drill, screws (if you're using wood), a measuring tape, a level, and a saw that’s right for your chosen material.
Building a sukkah from scratch is like making a family recipe. The core ingredients are the same for everyone, but the little details you add—the choice of wood, the slight angle of a wall—make it uniquely yours.
Sourcing Your S'chach: The Sacred Canopy
No matter which path you choose, every sukkah needs its crown—the s'chach. This organic roofing is the spiritual heart of the structure, and finding it is a key part of the sukkah-building experience.
You can often buy kosher s'chach mats online or from a local Judaica store. These are typically rolls of woven bamboo slats or palm fronds that are incredibly easy to unroll across the top of your frame. Honestly, they are a huge time-saver!
For a more traditional (and adventurous!) approach, you can gather your own. Some great options include:
- Palm Fronds: Classic, beautiful, and a joy to work with.
- Bamboo Poles: These can be laid one by one across the top beams.
- Evergreen Branches: Be prepared for some needles, but the smell is absolutely amazing!
- Corn Stalks: A fantastic option if you live in a rural area.
So, how much do you need? A good rule of thumb is to measure the square footage of your roof (length x width) and add 10% to ensure you have full coverage. Trust me, it's always better to have a little extra than to find yourself with a bare spot looking up at the stars
Your Sukkah Construction Adventure
Alright, let's bring that sukkah to life! This is where all your planning and gathering meets action, and honestly, it's one of my favorite parts of the entire Sukkot preparation. We're going to walk through this together, turning what could be a stressful chore into a joyful family project.
Whether you've got a shiny new kit or you're diving into a full-on DIY build, the basic flow is pretty much the same. You gather your parts, you build the structure, and you top it off with the s'chach.
Ultimately, it doesn't matter if you start with a kit or a pile of lumber. The goal is the same: creating a sturdy, welcoming space ready for its sacred roof. So, let’s get building!
Preparing Your Foundation
Before you connect a single pole or drive a single screw, stop and prep your site. Trust me, a few minutes of groundwork now will save you a world of headaches later. First things first, clear the area of any rocks, stray toys, or garden debris. You want a clean, flat slate to work with.
Is the ground level? A sukkah on a slope is a recipe for a wobbly, unstable structure. If you're on grass, you can slide flat pieces of scrap wood under the frame's legs to even things out. Building on a deck or patio? You've got a natural advantage with a flat surface!
This is a fantastic job for the kids, by the way. Hand them some small rakes and let them be in charge of making the "building zone" perfect. It gives them a real sense of ownership right from the get-go.
Raising the Frame: Your Sukkah’s Skeleton
With your site prepped and ready, it’s time to assemble the frame. This is the moment your sukkah really starts to take shape, and the excitement is contagious!
-
If you're using a sukkah kit: Lay out all the poles and connectors first. I like to group them by size to make finding what I need a breeze. Follow the instructions, which usually have you build the base rectangle on the ground, then add the vertical corner poles, and finally connect everything at the top. A rubber mallet is your best friend here for gently tapping stubborn pieces together without damaging them.
-
For a DIY wood or PVC frame: Your first move is to build two identical rectangular wall frames flat on the ground. Once they're assembled, you'll definitely need a helper (or two!) to stand them up parallel to each other. Then, you can connect them with your top and bottom crossbeams. Always, always use a level to make sure your vertical posts are straight before you secure them for good.
Building a sukkah is such a powerful lesson in persistence. Sometimes a piece won't fit, or a wall seems unsteady. But just like in life, you don't give up. You adjust, you reinforce, and you keep building, knowing the result will be a place of pure joy and shelter.
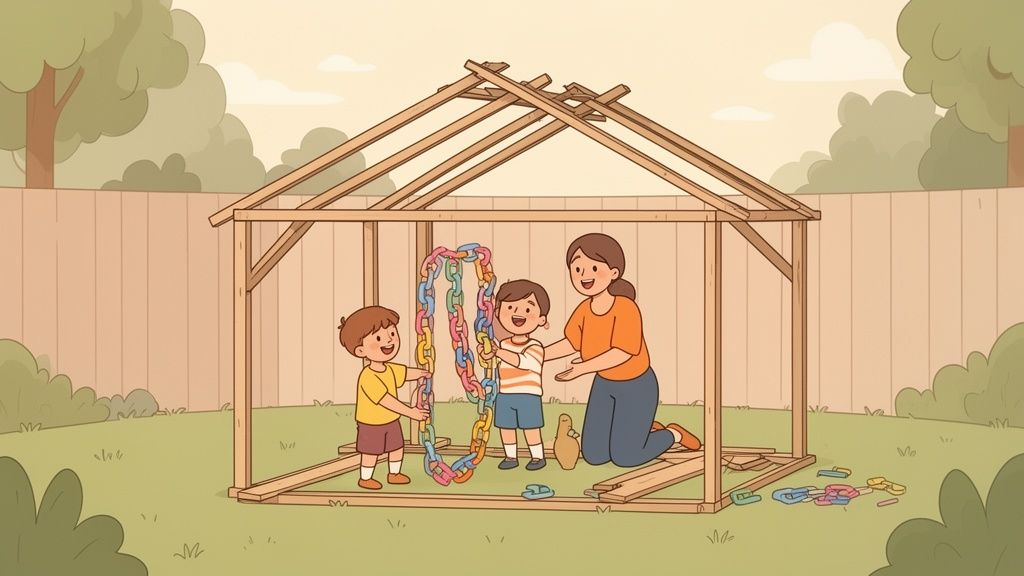
Attaching the Walls and Ensuring Stability
Once your frame is standing tall, it’s wall time! This is the step that officially transforms your structure from a skeleton into a cozy, defined space.
For most kits, this means unrolling fabric walls and securing them to the poles with the zip ties or bungee cords they provide. I always start at one corner and work my way around, pulling the fabric nice and taut as I go to avoid sags. Don't be shy with the fasteners! Use one every 12-18 inches along the top, bottom, and vertical poles to make sure the walls can handle a breezy evening.
If you’re using plywood or lattice for your DIY sukkah, attach the panels to the outside of your frame using screws. This is another moment where having a helper to hold a panel steady while you drill is an absolute game-changer.
This stage is also when you need to be thinking about safety. A shaky sukkah is a real hazard, especially if you're building on uneven ground or a balcony. We’ve all heard stories about makeshift sukkahs in precarious spots, which is exactly why taking the time to build a stable, secure structure is so critical. You can learn more about the importance of sukkah safety and construction standards to see why this step truly matters.
Placing the S'chach: The Sacred Canopy
And now for the grand finale—placing the s'chach. This is it. This is the final touch that makes your structure a kosher sukkah, connecting you to the sky and to generations of tradition.
Before you begin, lay wooden beams or sturdy poles (some people call them "schach supports") across the top of your frame, spacing them about 12 inches apart. These will support the weight of the s'chach and keep it from dipping into your sukkah. You never want to lay your s'chach directly on the frame itself.
Now, carefully lift your s'chach—whether it's a rolled mat or loose branches—and lay it across those support beams. The goal is to create a covering that gives you more shade than sun, but still leaves just enough space to glimpse the stars at night.
- Kid-Friendly Task: While the grown-ups handle the heavy lifting, the kids can be on "s'chach patrol" from the ground. They can hand up smaller branches or help make sure the bamboo mat unrolls correctly without snagging.
Once the s'chach is in place, take a step back and just admire what you've created. You did it! You’ve successfully completed the mitzvah of making a sukkah, creating a beautiful, temporary home ready for a week of celebration, reflection, and pure joy.
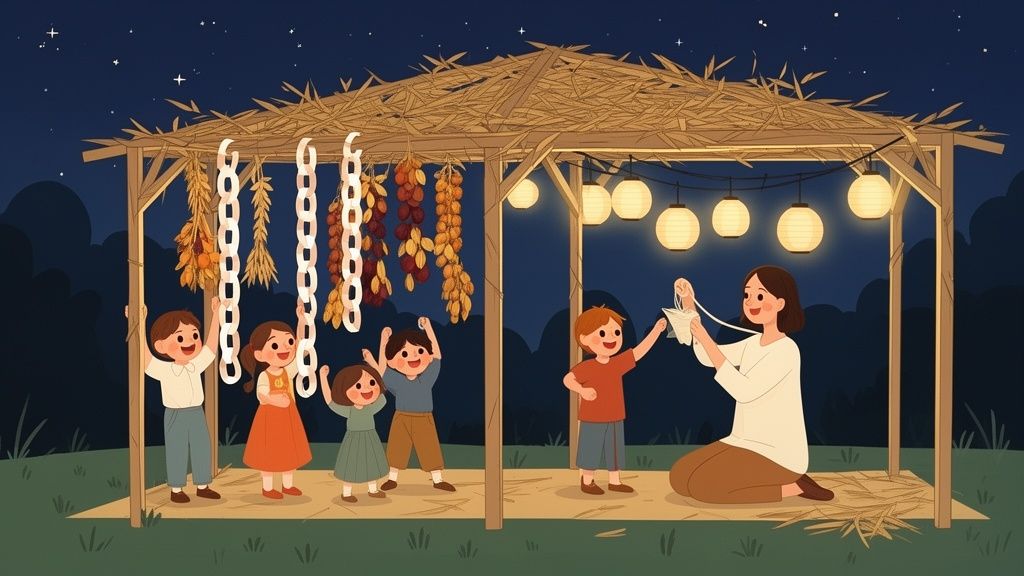
It's Time to Decorate! Making the Sukkah Your Own
Okay, the walls are up, the s'chach is on, and your sukkah is officially standing! Now for the best part—turning this simple structure into a vibrant, personal, and joy-filled space for your family. This is where the real magic happens.
Decorating the sukkah is more than just a fun project; it's a beautiful mitzvah called hiddur mitzvah, which means "beautifying the commandment." It’s our chance to pour our love and creativity into this temporary home, and there’s no better way to do it than by getting everyone, from toddlers to teenagers, in on the action.
Forget about perfection. This is all about creating a space that radiates your family’s unique spirit, filled with handmade treasures and a whole lot of laughter.
Unleash That Creative Energy with Kid-Friendly Crafts
Let's be honest, the most cherished decorations are the ones made with love (and probably a healthy amount of glue and glitter). I always recommend setting aside a dedicated crafting afternoon before the holiday begins. It builds so much excitement and gives your kids a real sense of ownership over the celebration.
Here are a few classic ideas that never fail:
- Epic Paper Chains: A timeless classic for a reason! They're simple enough for tiny hands to master but have a huge visual payoff. Grab construction paper in rich, autumnal colors and challenge everyone to see who can make the longest chain.
- Hanging Harvest Goodies: Lean into the harvest theme by hanging real (or fake!) gourds, mini pumpkins, apples, and pomegranates from the beams. Kids absolutely love being in charge of tying the ribbons and finding the perfect spot for each one.
- Our Family Banner: This is one of my favorites. Just unroll some butcher paper or grab a poster board and let everyone design their own section. You can write blessings, draw portraits of your family celebrating, or just let the little ones go wild with paints and markers.
The most beautiful sukkah isn't the one with the fanciest store-bought decor. It's the one where you can feel the heart and soul that went into every handmade ornament and every slightly crooked sticker. It’s a collage of your family’s love.
Weave in Some Deeper Meaning
Beyond the fun crafts, your decorations are a fantastic opportunity to teach your kids about the meaning behind Sukkot. You're creating an atmosphere that feels both festive and sacred.
A beautiful tradition is to honor the Ushpizin—the seven heavenly "guests" we invite into our sukkah each night (Abraham, Isaac, Jacob, Joseph, Moses, Aaron, and David). You can find some gorgeous Ushpizin posters online, or better yet, have your kids draw their own portraits of these biblical heroes to hang on the walls. It’s an incredible way to bring these ancient stories to life right before their eyes.
Many families also hang pictures of Jerusalem or other special places in Israel to feel that powerful connection to our heritage. This tradition connects us to a global celebration. Millions of Jews and even some Christians participate worldwide. Chabad-Lubavitch, the largest Jewish organization on the planet, runs 3,500 institutions across more than 100 countries, making the sukkah a vibrant symbol of Jewish life everywhere. A 2020 study actually found that 38% of American Jews—about 2.2 million people—have connected with Chabad in some way. It's amazing to think about! You can discover more about Chabad's global reach and sukkah observance.
Light Up the Night
When the sun goes down, the right lighting can completely transform your sukkah into an enchanted little world. Safety is a top priority, of course, so always use lights and extension cords specifically rated for outdoor use.
- LED String Lights: These are the gold standard. They're energy-efficient, stay cool to the touch (super important with kids and flammable materials!), and come in endless styles. Warm white lights give off a wonderfully cozy glow.
- Paper Lanterns: For a touch of whimsy, you can't beat battery-operated paper lanterns. Hang them at different heights to create a bit of visual drama.
- Solar-Powered Lights: Want an easy, eco-friendly option? Solar-powered string lights or garden stakes are perfect. They charge up all day and then pop on automatically as it gets dark.
Let your family’s personality shine through in every single choice you make. And if you're looking for even more holiday inspiration, check out our fun Hanukkah preschool crafts—many of them can easily be adapted for Sukkot
Common Sukkah Building Questions Answered
Building your first sukkah is a huge thrill! But let's be honest, it’s a unique project that mixes construction with deep spiritual meaning, so it's totally normal for a few questions to pop up.
Think of this as your friendly cheat sheet for those "Wait, how does this work?" moments. We've rounded up the most common questions families ask, so you can feel totally confident and focus on the joy of the mitzvah.
How Long Does It Take to Build a Sukkah?
This is the big one, isn't it? The real answer is: it totally depends on the path you choose! Going with a convenient kit versus a rewarding DIY project will be the biggest factor in your timeline.
A typical sukkah kit is engineered for speed. With pre-cut parts that just snap or screw together, you can have your structure standing in 1 to 3 hours. Seriously! Grab a partner, and you'll be done before you know it. It's an amazing choice for busy families who want a beautiful sukkah without clearing their entire weekend.
On the other hand, building a sukkah from scratch is a true labor of love. You’ve got to factor in measuring twice and cutting once, sourcing all your materials (like wood or PVC), and the full assembly. A DIY build could take you anywhere from a solid afternoon (4-5 hours) to a full weekend project. My best advice for a smooth DIY experience? Get organized! Have every tool and piece of lumber ready to go before you start. And don't be shy about inviting friends over—many hands make light work and can turn the build into a fantastic pre-holiday party!
What Are the Best Weatherproofing Tips for a Sukkah?
Since your sukkah becomes your family's go-to spot for a week, prepping it for the elements is a brilliant move. Weather can be a wild card, but with a couple of clever tricks, you can keep your sukkah cozy and safe.
For rain, the most common solution is a simple waterproof tarp you can quickly unroll over the s'chach. This saves your decorations and table from a sudden downpour. The critical rule here is that the tarp cannot be a permanent fixture. It absolutely must be easy to roll back the moment the rain stops so your s'chach is open to the sky again.
Wind is another big one to plan for. Securing your frame is non-negotiable for safety.
- On a Lawn or Dirt: If your sukkah is on soft ground, use heavy-duty stakes to anchor the frame's feet firmly into the earth.
- On a Deck or Patio: For hard surfaces, heavy sandbags at the base of each corner post work like a charm. You can also use strong rope to tie the frame to a secure railing.
A sukkah isn’t meant to be a fortress against the elements, but a shelter within them. It's a beautiful reminder that our true security comes from faith and community, not impenetrable walls—even when the wind blows.
Can I Build a Sukkah on My Apartment Balcony?
You absolutely can! Putting a sukkah on a balcony is a fantastic way for city dwellers to embrace the mitzvah right outside their door. But there’s one critical, non-negotiable rule you have to follow for your sukkah to be kosher.
There must be nothing between your s'chach and the open sky.
This means if you have a permanent roof or another balcony directly above yours, that spot won't work. The s'chach needs a totally unobstructed view of the heavens. Top-floor balconies or those that jut out from the building are often perfect candidates.
Before you buy a single thing, your first step should be to check your building's regulations. Some apartment complexes have specific rules about structures on balconies for safety and aesthetic reasons. Once you get the all-clear, a lightweight sukkah kit is often the perfect choice for a balcony since they are easy to carry, assemble, and secure in a tighter space.
At Torah Tales, we believe in making Jewish traditions come alive for children. Imagine your child's delight as they see themselves become the hero in classic Torah stories, fostering a deep and personal connection to their heritage. Explore our collection of personalized books at https://mytorahtale.com and give a gift that builds a foundation of faith, one story at a time.
